Tutorial - Setup
In this tutorial, our goal is to setup a dynamic online e-commerce store that can be fully managed by business users. We will be using the Lambda Genie Console to setup the business rules, feature flags, and dynamic configuration and customize them for multiple environments. Finally, we will be using the Lambda Genie SDK to consume these in our consumer application. We will be using all the features of the Lambda Genie including
- Node JS Rules Engine
- Intelligent feature flags
- Custom Dynamic Configuration
- AWS Dynamic Configuration
Setup and Consumption
As mentioned before, Lambda Genie works seamlessly with AWS Lambda. However, it can be used with any platform that runs Node.js. The first part of this tutorial will be using the Lambda Genie Console, where you will be creating business entities, rules, feature flags, and dynamic configurations. This part is common to all platforms. The second part of this tutorial will be using the Lambda Genie SDK to consume these in our consumer application. There are 2 versions of the SDK, one for Node.js and one for AWS Lambda. We will be demonstrating both.
Getting Started
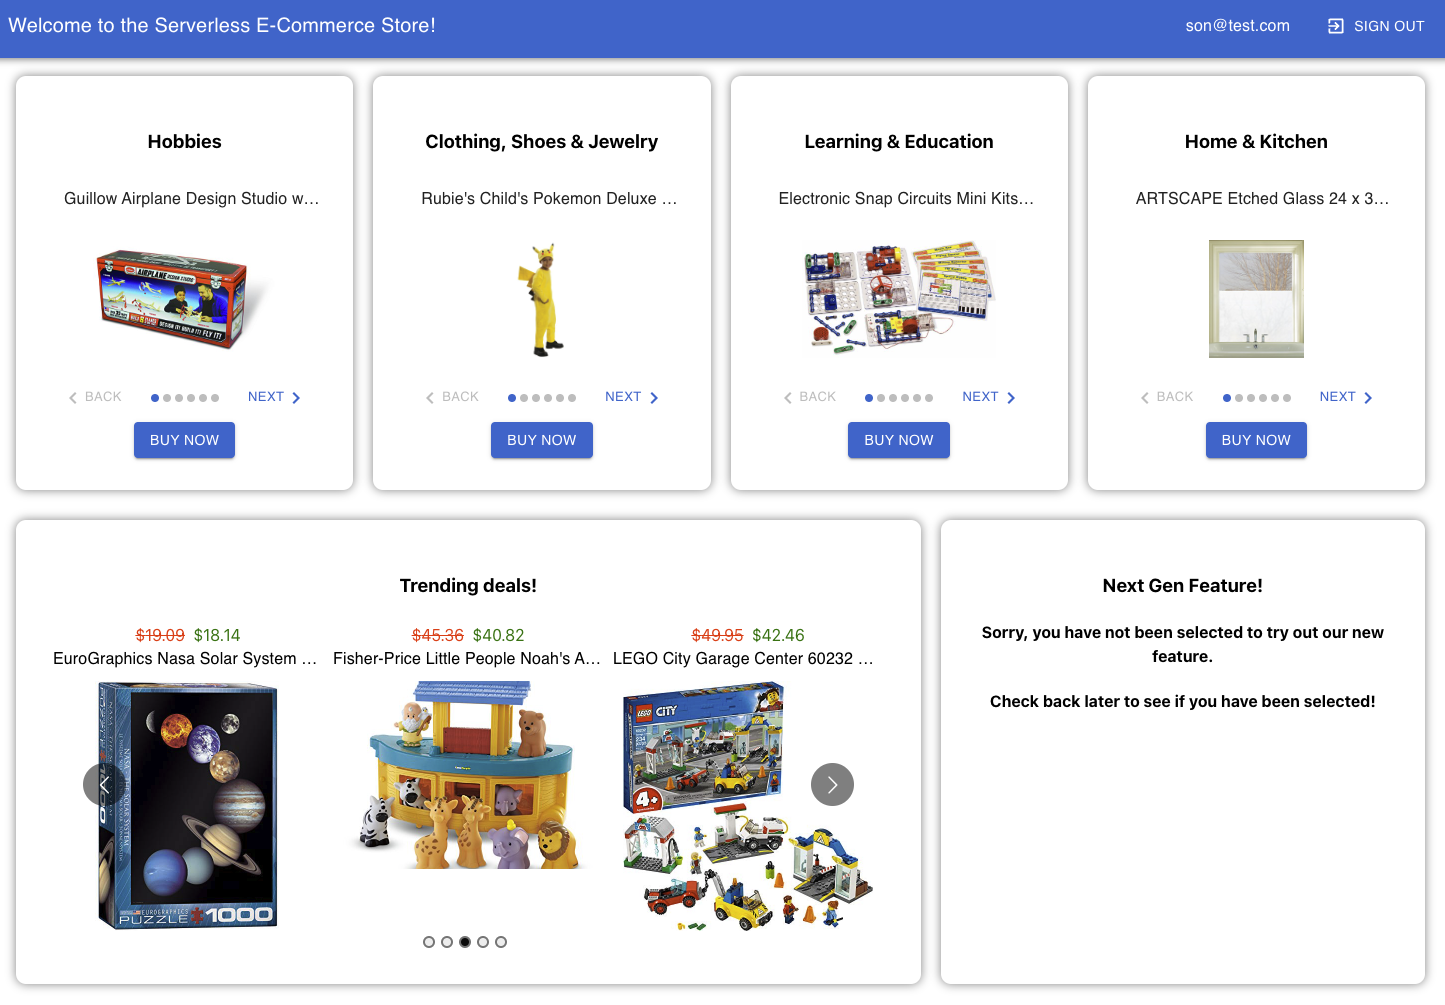
In this tutorial, we will be building an online e-commerce store. There will be 2 rows where we will showcase products.
In the first row, we will have 4 slots, where business users can choose the categories of products that they want to showcase. The second slot - the Clothing, Shoes & Jewelry slot below will have further customizations where we will show targeted products based on the age and gender of the logged-in user.
The second row will have 2 slots, a carousel of curated products that are on sale, where the business users can choose the products that they want to showcase and the discount that they want to offer. The second slot will have a placeholder for a feature flag-protected feature. This feature will be enabled for a select group of users.
The final product will look like this:
There are 2 steps to this tutorial. The first step is to setup your account using the Lambda Genie Console. The second step is to setup the consumer application.
Step 1: Setup your account using the Lambda Genie Console
If you do not have an account, you can create one by going to https://app.lambdagenie.com. If you already have an account, you can login to your account by going to https://app.lambdagenie.com. Once you login, you will be taken to the Lambda Genie Console.
Configure your Business Entities
- Click on the
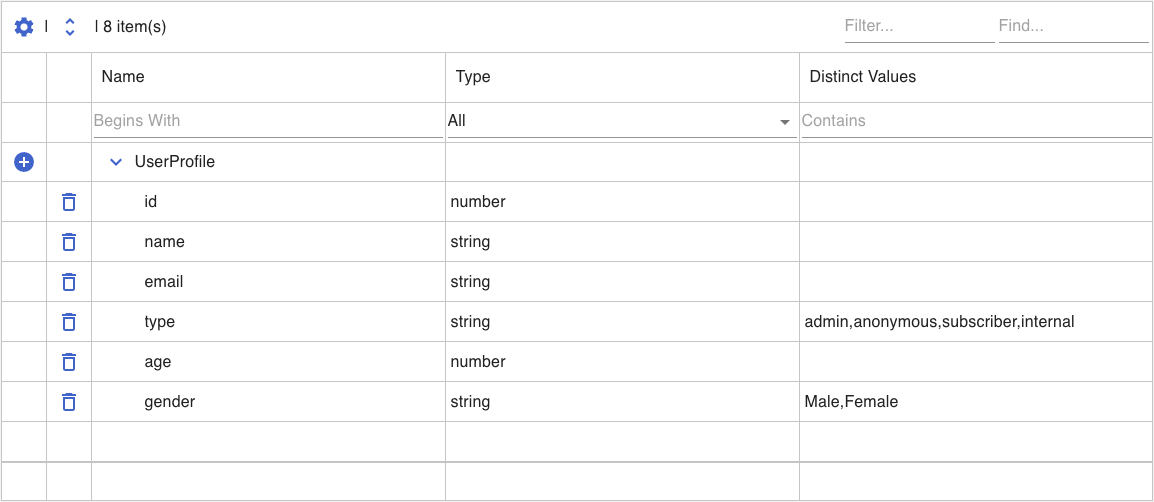
Entitiesmenu item on the left-hand side of the screen. This will take you to the Business Entities screen. - You should see a UserProfile entity. This is the default entity we create for you. In our application, we will be using this entity to store the user profile information, but we will be adding a few more fields to it. Click on the add icon next to the UserProfile entity. This will let you add a new field to the UserProfile entity. Add the following fields to the UserProfile entity:
- age: Change the type to number
- gender : Click on the distinct values column, and add the strings Male,Female to the popup.
- Once you have added the fields, you should have a UserProfile entity that looks like this:
- Although you can setup additional business entities, we will not be using any additional business entities in this tutorial.
Configure your Environments
- Click on the
Listsmenu item on the left-hand side of the screen. This will take you to the Lists screen. - You should see a list called
Environments. By default, this list will have 3 environments - dev, test, and prod. You can add more environments if you want. For this tutorial, we will be using the following environments:- dev
- test
- prod
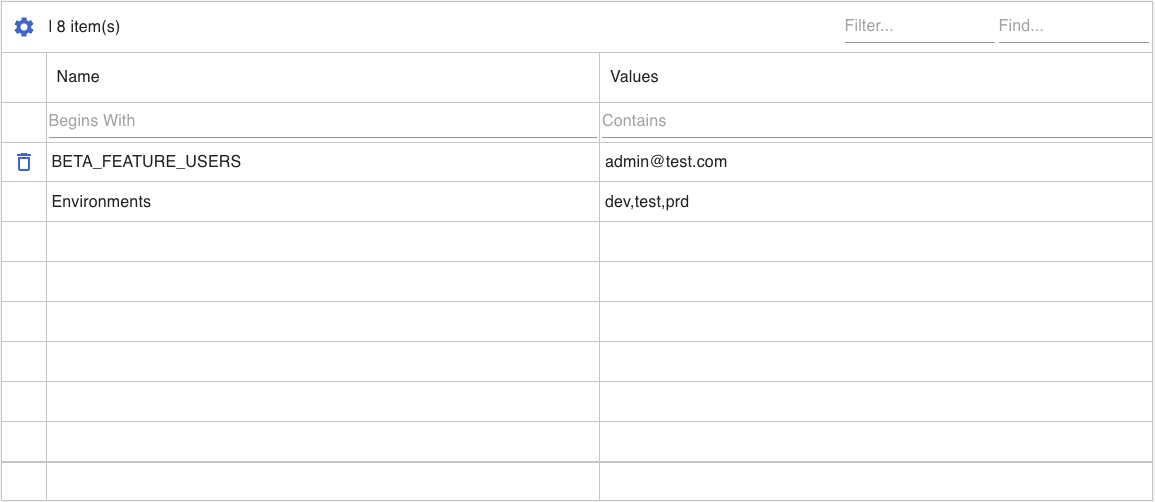
Add a new list for beta testers
- Click on the
Listsmenu item on the left-hand side of the screen. This will take you to the Lists screen. - Click on the
Create Newbutton. This will open up a popup where you can add a new list. Add a new list calledBETA_FEATURE_USERS. This list will be used to store the list of beta testers. - Once the list is created, click on the empty values column for the list. This will open up a popup where you can add values to the list. Add the following values to the list.
- Switch the
Environmentdropdown totest. This will let you add values to the list for the test environment. Add the following values to the list. - You may be wondering, what if I want to enable all users in dev? Fear not, we will be covering that in the rule setup.
Once you have added the values to the list, you should have a list that looks like this:
Configure your Rules
- Click on the
Rulesmenu item on the left-hand side of the screen. This will take you to the Rules screen. - Click on the
Create Newbutton. This will open up a popup where you can add a new rule. Add a new rule calledNEXT_GEN_FEATURE. This rule will be used to enable the beta feature for the beta testers. - Once the rule is created, click on the
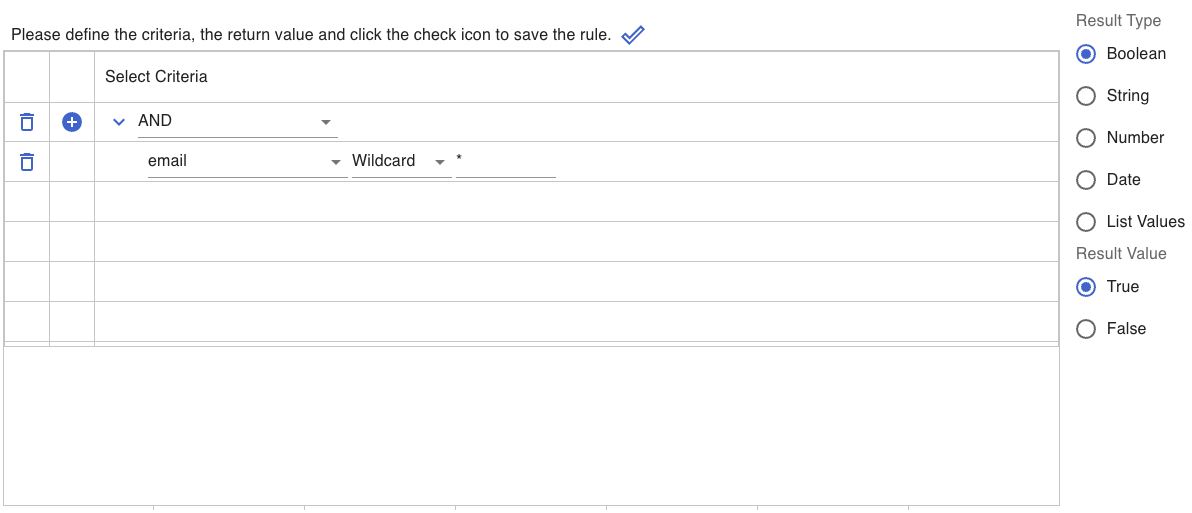
Add Rulebutton. This will open up a popup where you can edit the rule. - Click on the
+button next to theANDdropdown. This will add a new condition to the rule. Add the following conditions to the rule:Field:emailOperator:In Predefined ListValue:BETA_FEATURE_USERS
- In the Result Type, select
Boolean. In the Result Value, selecttrue. This will enable the beta feature for the beta testers. These should be the only conditions in the rule. - When you are done, your rule should look like this:
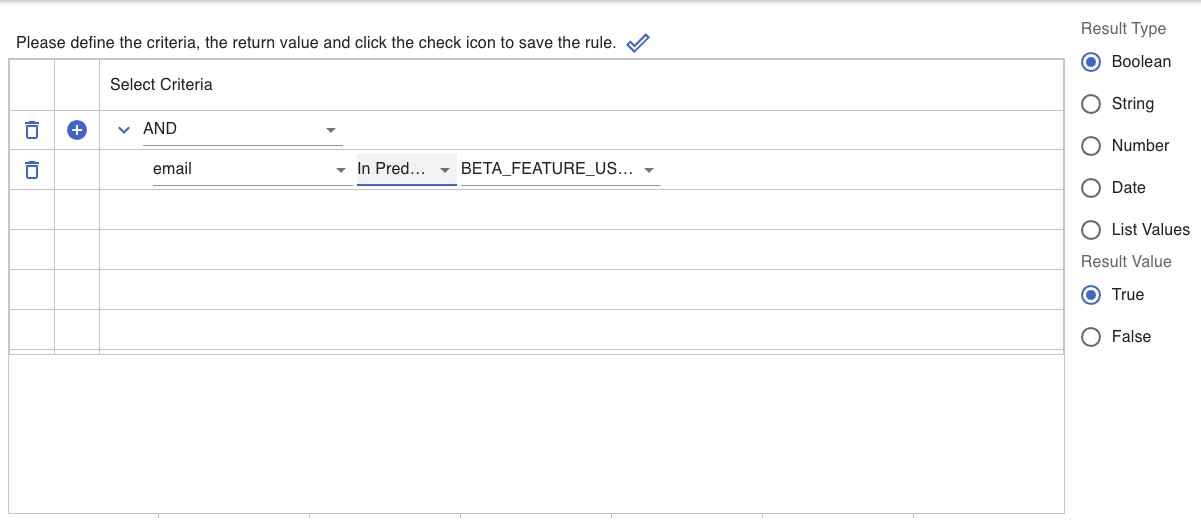
- Click on the
Checkicon button. This will save the rule. - Once you are back on the Rules screen, change the
Environmentdropdown todev. This will let you add a new rule for the dev environment. Click on theCreate Newbutton. This will open up a popup where you can add a new rule. Similar to the step above, add the following conditions to the rule:Field:emailOperator:WildcardValue:*
- In the Result Type, select
Boolean. In the Result Value, selecttrue. This will enable the beta feature for all users in dev. These should be the only conditions in the rule. - When you are done, your rule should look like this:
Now that we have configured the feature flag rule, let's also configure the rules for the product recommendations. This rule won't have environment-specific rules, so we will be configuring it with the "All" environment option selected.
Click on the
Rulesmenu item on the left-hand side of the screen. This will take you to the Rules screen.Ensure the
environmentdropdown is set toAllClick on the
Create Rule Setbutton. This will open up a popup where you can add a new rule set. Add a new rule set calledHOME_PAGE_PERSONALIZATION. This rule set will be used to recommend products to the users.Once the rule set is created, click on the
Add Rulebutton. This will open up a popup where you can edit the rule.Click on the
+button next to theANDdropdown. This will add a new condition to the rule. Add the following conditions to the rule:Field:ageOperator:Less ThanValue:20
Click on the
+button next to theANDdropdown. This will add a new condition to the rule. Add the following conditions to the rule:Field:genderOperator:In ListValue:Male
In the Result Type, select
String. In the Result Value, typeBoys. This will recommend men's shoes to the users. These should be the only conditions in the rule.Click on the
Checkicon button. This will save the rule.Once you are back on the Rules screen, click on the
Add Rulebutton. This will open up a popup where you can edit the rule.Click on the
+button next to theANDdropdown. This will add a new condition to the rule. Add the following conditions to the rule:Field:ageOperator:Less ThanValue:20
Click on the
+button next to theANDdropdown. This will add a new condition to the rule. Add the following conditions to the rule:Field:genderOperator:In ListValue:Female
In the Result Type, select
String. In the Result Value, typeGirls. This will recommend women's clothing to the users. These should be the only conditions in the rule.Click on the
Checkicon button. This will save the rule.Once you are back on the Rules screen, click on the
Add Rulebutton. This will open up a popup where you can edit the rule.Click on the
+button next to theANDdropdown. This will add a new condition to the rule. Add the following conditions to the rule:Field:genderOperator:In ListValue:Male
In the Result Type, select
String. In the Result Value, typeMen. This will recommend men's clothing to the users. These should be the only conditions in the rule.Click on the
Checkicon button. This will save the rule.Once you are back on the Rules screen, click on the
Add Rulebutton. This will open up a popup where you can edit the rule.Click on the
+button next to theANDdropdown. This will add a new condition to the rule. Add the following conditions to the rule:Field:genderOperator:In ListValue:Female
In the Result Type, select
String. In the Result Value, typeWomen. This will recommend women's clothing to the users. These should be the only conditions in the rule.Click on the
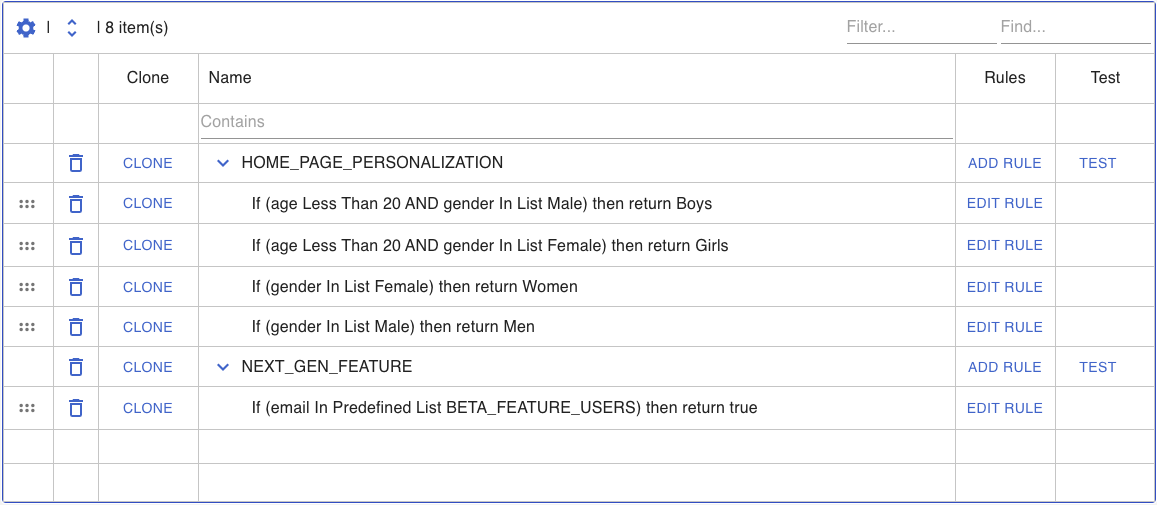
Checkicon button. This will save the rule.Once you are done, your rules should look like this:
Setup Dynamic Configuration
Now that we have configured the rules, let's setup the dynamic configuration. Click on the Dynamic Configs menu item on the left-hand side of the screen. This will take you to the Dynamic Configuration screen. Click on Configuration Schemas. This will take you to the Configuration Schemas
Use Chat GPT to create your configuration schemas
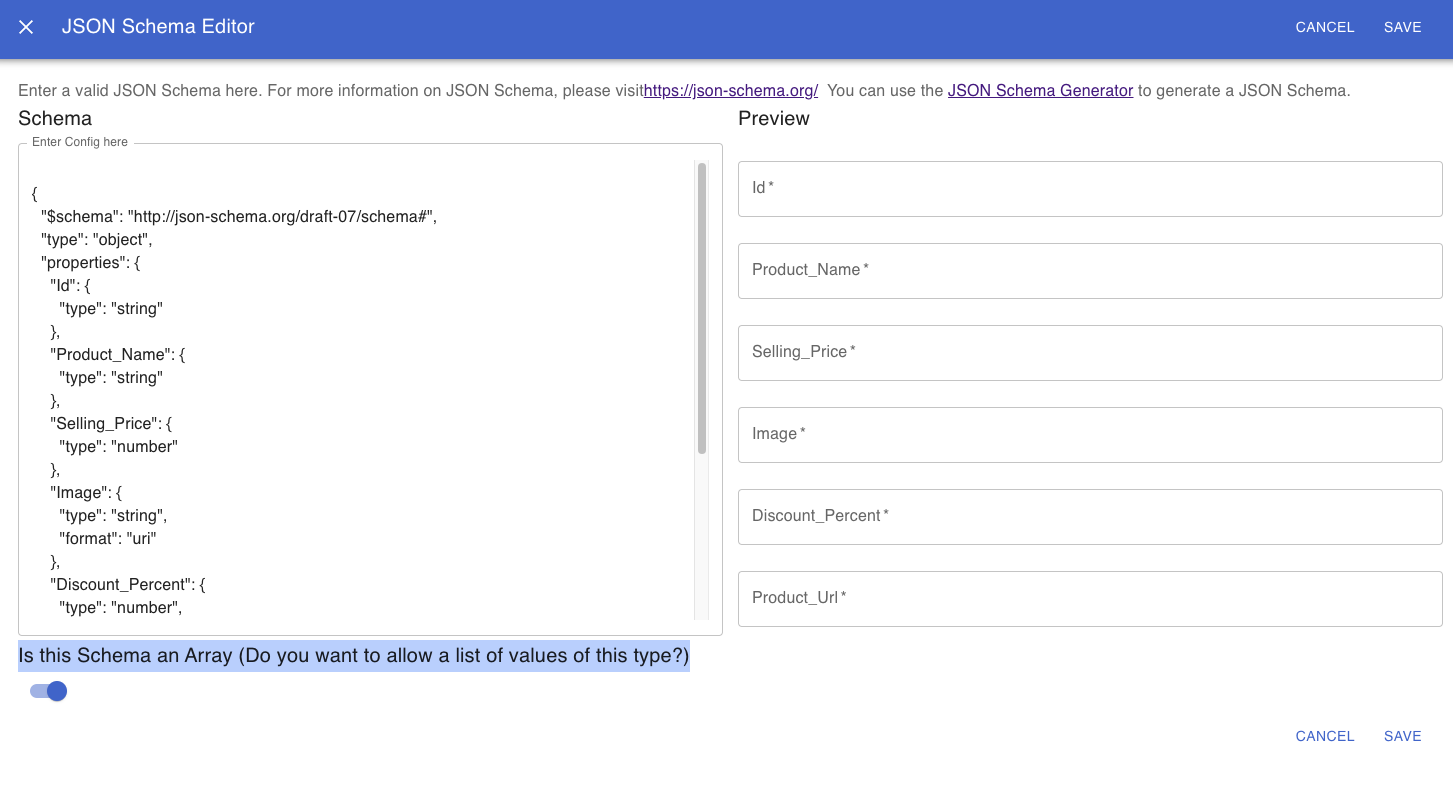
Although you can create configuration schemas manually, we recommend using Chat GPT to create your configuration schemas. This will allow you to create your configuration schemas using simple English. For example, let's ask Chat GPT - "Can you make a JSON schema with Id, Product_Name, Selling_Price, Image, Discount_Percent(between 0 and 25), and Product_Url"
Chat GPT will give us this. Let's save this as FEATURED_PRODUCTS
{
  "$schema": "http://json-schema.org/draft-07/schema#",
  "type": "object",
  "properties": {
    "Id": {
      "type": "string"
    },
    "Product_Name": {
      "type": "string"
    },
    "Selling_Price": {
      "type": "number"
    },
    "Image": {
      "type": "string",
      "format": "uri"
    },
    "Discount_Percent": {
      "type": "number",
      "minimum": 0,
      "maximum": 25
    },
    "Product_Url": {
      "type": "string",
      "format": "uri"
    }
  },
  "required": ["Id", "Product_Name", "Selling_Price", "Image", "Discount_Percent", "Product_Url"]
}
When you paste in the JSON schema, Lambda Genie will create a form that shows you the fields from the JSON schema. You can edit the fields and add more fields if you want. Since we want the business users to enter multiple products, we set the flat Is this Schema an Array (Do you want to allow a list of values of this type?) to Yes.
Once you are done, click on the Save button. This will save the configuration schema. This is what the form looks like:
Similarly, let's create a schema for the slots. Let's call this HOMEPAGE_SLOT_DETAILS
{
  "$schema": "http://json-schema.org/draft-07/schema#",
  "type": "object",
  "properties": {
    "slot1": {
      "type": "string"
    },
    "slot2": {
      "type": "string"
    },
    "slot3": {
      "type": "string"
    },
    "slot4": {
      "type": "string"
    },
    "maxProducts": {
      "type": "integer",
      "minimum": 1,
      "maximum": 10
    }
  },
  "required": ["slot1", "slot2", "slot3", "slot4", "maxProducts"]
}
Once you are done, click on the Save button. This will save the configuration schema.
Add Configuration Values
Now that we have created the configuration schemas, we can add configuration values. Click on the Lambda Specific Configurations menu item. This will take you to the Configuration Values screen for the lambda. Click on the Create New button. This will open up a popup where you can add the lambda key. Enter GET_PRODUCTS as the lambda key. This will be the key that we will use to get the configurations from the lambda. Once the lambda key is entered, click on the + button. This will allow you to add a configuration value. Let's call this SLOT_NAMES. The default type is StaticValue, but we will change this. Double-click on the item and change the type to HOMEPAGE_SLOT_DETAILS and click next. This will open up a form where you can enter the values for the slots. Enter the following values:
slot1:Hobbiesslot2:Clothing, Shoes & Jewelryslot3:Learning & Educationslot4:Home & KitchenmaxProducts:5Click Next, and then click on theSavebutton. This will save the configuration value.
Let's add another configuration value and call it FEATURED_PRODUCTS. The default type is StaticValue, but we will change this. Double-click on the item and change the type to FEATURED_PRODUCTS and click next. This will open up a form where you can enter the values for the products. Since we want to enter multiple products, we will click on the Add button. This will add a new row. You can enter values individually, but for this tutorial, you can just go over to the Free Form Input tab and paste in the following JSON:
[
  {
    "Id": "1",
    "Product_Name": "VTech Scoop & Play Digger",
    "Selling_Price": 23.39,
    "Image": "https://images-na.ssl-images-amazon.com/images/I/51J74xuLipL.jpg",
    "Discount_Percent": 15,
    "Product_Url": "https://www.amazon.com/VTech-80-518600-Scoop-Play-Digger/dp/B07PTBVXCX"
  },
  {
    "Id": "3",
    "Product_Name": "HHIP 4902-0045 Hastings Triplet Magnifier, 10 x Power, 21 mm Lens Diameter",
    "Selling_Price": 40.36,
    "Image": "https://images-na.ssl-images-amazon.com/images/I/41DtsdgvDRL.jpg",
    "Discount_Percent": 10,
    "Product_Url": "https://www.amazon.com/HHIP-4902-0045-Hastings-Magnifier-Diameter/dp/B01LW5FLSQ"
  },
  {
    "Id": "4",
    "Product_Name": "EuroGraphics Nasa Solar System 1000 Piece Puzzle",
    "Selling_Price": 19.09,
    "Image": "https://images-na.ssl-images-amazon.com/images/I/51Jq9C7inWL.jpg",
    "Discount_Percent": 5,
    "Product_Url": "https://www.amazon.com/EuroGraphics-Solar-System-Piece-Puzzle/dp/B001V9CMBO"
  },
  {
    "Id": "5",
    "Product_Name": "Fisher-Price Little People Noah's Ark, Frustration Free Packaging",
    "Selling_Price": 45.36,
    "Image": "https://images-na.ssl-images-amazon.com/images/I/51Lf27efZcL.jpg",
    "Discount_Percent": 10,
    "Product_Url": "https://www.amazon.com/Fisher-Price-Little-People-Noahs-Ark/dp/B00CQHYXOO"
  },
  {
    "Id": "6",
    "Product_Name": "LEGO City Garage Center 60232 Building Kit, New 2019 (234 Pieces)",
    "Selling_Price": 49.95,
    "Image": "https://images-na.ssl-images-amazon.com/images/I/51TQ-Xy6OsL.jpg",
    "Discount_Percent": 15,
    "Product_Url": "https://www.amazon.com/LEGO-Garage-Center-Building-Pieces/dp/B07PZQ133B"
  }
]
This is where your business users would make their customizations. For enterprise customers with multiple users, non-admin users are not allowed to make changes to the configuration schemas. They can only add configuration values.
Step 2: Publish your configuration
Now that you are done with the rules, you are ready to publish the configuration. Click on the Publish menu item on the left-hand side of the screen. This will take you to the Publish screen. You will be presented with a screen that will allow you to choose the environment and the publishing method.
When you define rules and configurations, you have the option to customize them for different environments. You can choose to deploy these configurations in a single file or individual files for each environment. For smaller projects (or if you do not have any environment-specific values), you can choose to deploy all configurations in a single file, but for larger projects, you may want to deploy configurations for each environment separately, so your runtime loads only the configurations it needs for the environment it is running in. For this tutorial, we will be deploying all configurations in a single file, so select the All option for the Environment dropdown.
Now for the publishing method, you have the following options:
Download: This will download the configuration file to your local machine. You can then upload this file to your runtime.Publish: This will upload the configuration file to an endpoint you specify.Enterprise Options: These are custom options we build for our enterprise customers. If you are an enterprise customer, there will be a button here to trigger your custom publishing workflow.
Downloading the configuration file
This is the easiest way to get started. Click on the Download button. This will download the configuration file to your local machine. You can open this file in a text editor to see the contents. It's a JSON file, and you should be able to see the rules you created in the previous step. If you wish to use this method for this tutorial, you can upload this file to an S3 bucket, but please be certain to ensure your lambda function has access to this bucket.
Publishing the configuration file
This is a semi-automated way of performing the same steps as in the download option. Click on the Publish button. This will open up a popup where you can specify the endpoint where you want to publish the configuration file. Here, you can enter a pre-signed URL to an S3 bucket, or you can enter a URL to an API endpoint. Enter the endpoint you would like to publish to. This can be an S3 bucket or a form post URL. If it is an S3 bucket, please ensure that it is a pre-signed URL with the 'putObject' operation. (Note: the pre-signed URL generated by the CLI or the AWS Console will not work. Here is a script you can use to generate a pre-signed URL: https://gist.github.com/flexicious/e836c8d5fa06d713e8770b25aee06b65). You can choose to remember this endpoint for future publishes. We will not store your credentials, it's only retained in your browser's memory. If you close your browser, you will have to re-enter the endpoint.
Regardless of what option you choose, the ultimate goal is to get the configuration file into a bucket your lambda function can access. If you are using the Download option, you can upload the file to the bucket. If you are using the Publish option, you can use the pre-signed URL to upload the file to the bucket.
Enterprise Options
If you are an enterprise customer, you will see a button here to trigger your custom publishing workflow. This will allow you to publish the configuration file to your custom endpoint. This is often used in combination with some sort of approval workflow, usually through Github, or a custom workflow we will build for you. This flow also allows you to maintain version control of your configuration files, roll back to previous versions, trigger automated tests, and more. Please contact us if you are interested in this option.